
INSTALLATION INSTRUCTIONS
What’s included:
- Keep The Heat Head Unit
- 20’ metal duct work (22”x16”x48” sections)
- Duct work connectors
- (8) 4”x4” Corrugated Tubing Adaptors
- 56 Ring spacers
- 4 Rolls black tape
- Muffler System
- Shutter System
What you need to provide:
- 8 pieces of 4″ solid corrugated tubing 20′ long. It is best to buy the tubing in 10’ sticks if available. If you must buy a coiled roll of corrugated tubing, buy 1×250’ rolls and cut tube into 20’ pieces. Iif you buy rolled corrugated tubing, the straighter the tubing, the better the airflow.
- Approximately 500’ of 4” pipe. This could be metal spiral or S&D PVC (Schedule 20).
- Fittings for 4” pipe. Typical installation requires (24) 90°’s and (8) 45°’s per system.
- Support hangers. These are to support the 20′ duct work and hangers for the 8 pipes. Angle iron or uni-strut, and all-thread work best for to hand the duct work. Snap-N–Strut pipe hangers work well to hang the pipe.
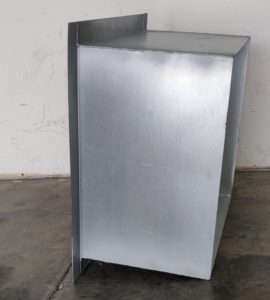
- Mounting Collar for head unit penetration into building. Picture included.
- Hardware #10 x 1” Self Tapping Screws, Nuts, Bolts
- Approximate installation time is 40 labor hours
Installation Instructions:
- Choose the best location for the fan housing of the system. Things to consider: Roof overhang on exterior of building for clearance of fan housing. Clearance of 20’ of duct in ceiling.
- Construct mounting collar for the side of your building. Use galvanized metal, For dual skinned walls the collar should be 21.625”x 22.625”x14”, with a 2” flange. For single skinned walls, the collar should be 21.625”x 22.625”x2”, with a 3” flange. Pre drill holes in collar to fasten the fan housing.
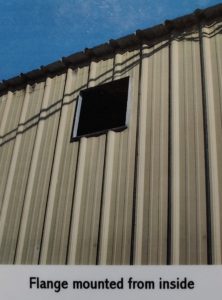
- Cut hole in your building (21.75” up and down, 22.75” across), insert mounting collar and attach collar to the building. Collar should be mounted from inside the building and attach fan housing using #14×1.5” self tapping Tek screws from the outside of the building.
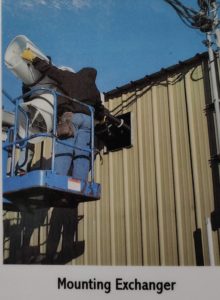
- Insert head of the head unit into the mounting collar. Attach head unit to the mounting collar using Tek screws. Using pre-drilled holes, screw through the side of the mounting collar into the head unit of the system. Be careful not to strip the threads in the plastic. IMPORTANT – Make sure both fan blades spin unobstructed inside of head of system. Some minor right/left or up/down adjustment may be needed.
- Caulk exterior of system. Caulk around mounting collar and head unit of system.
- Assemble duct work (See attached instructions). Duct work can be assembled into a single 20’ piece, or into multiple pieces depending on clearance.
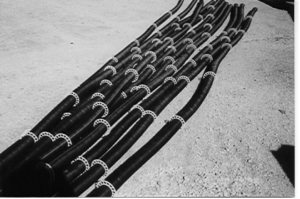
- Snap ring spacers on corrugated tubing every three to four feet on each of the eight 4” corrugated tubes.
- Attach hangers for duct work to ceiling. At least 3 hangers per 20 of duct are required. Threaded rod and angle iron/uni-strut are the best materials for duct hangers.
- Assemble duct work (See attached instructions). Duct work can be assembled into a single 20’ piece, or into multiple pieces depending on clearance.
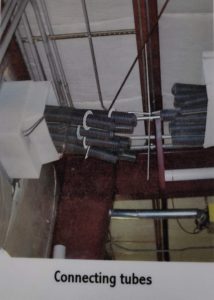
- Snap ring spacers on corrugated tubing every three to four feet on each of the eight 4” corrugated tubes. (See picture)
- Attach hangers for duct work to ceiling. At least 3 hangers per 20’of duct are required. Threaded rod and angle iron/uni-strut are the best materials for duct hangers.
- Insert corrugated tubing into duct. Push tubing into duct from the end of the duct farthest away from the wall. Push tubing though far enough the 2’ of tubing sticking out the end closest to the wall.
- Raise duct to ceiling. Secure hanger underneath duct. Connect tubing in duct to tubing in the fan housing with couplers, screws and black tape. Slide duct onto fan housing and secure with screws.
- Caulk duct to fan housing and caulk between collar and fan housing.
- Install end cap and shutter (See additional instructions)
- Attach 4” tubing to 4” pipe using the supplied adaptors. All tubing should be screwed and taped to 4” pipe. Using the flexibility of the tubing, determine the direction of each pipe and where each pipe will be routed all the ceiling. You may want to install and additional hanger to support the transition from corrugated tube to pipe.
- Run the pipe along the ceiling to walls or columns. Pipe should end about 3-5’ from the floor.
- Install mufflers. Best location is when the pipe turns down from the ceiling toward the floor. (See attached instructions)
- Install 45° elbows at the ends of pipe. 45° elbows help push the air away from the walls and toward the center of the building. This makes for optimal air flow.
- Electrician is needed to wire power to system. Have electrician wire motors to separate switches, one for intake air (left motor lead) and one for exhaust (right motor lead). Each motor is variable speed and speed controls can be installed if desired.
![]()